I've been using Git for a dozen years. Eight years ago, I had to give a training session on Git (and GitHub) to a partner company about to create an open source project, and I'm going to tell you here about the way I taught it. Incidentally, we created internal training sessions at work since then that use the same (or similar) approach. That being said, I didn't invent anything: this is heavily inspired by what others wrote before, including the Pro Git book, though not in the same order, and that IMO can make a difference.
The reason I'm writing this post is because over the years, I've kept seeing people actually use Git without really understanding what they're doing; they'd either be locked into a very specific workflow they were told to follow, and unable to adapt to another that, say, an open source project is using (this also applies to open source maintainers not really understanding how external contributors use Git themselves), or they'd be totally lost if anything doesn't behave the way they thought it would, or if they made a mistake invoking Git commands. I've been inspired to write it down by Julia Evans' (renewed) interest in Git, as she sometimes ask for comments on social networks.
My goal is not to actually teach you about Git, but more about sharing my approach to teaching Git, for others who will teach to possibly take inspiration. So if you're learning Git, this post was not written with you in mind (sorry), and as such might not be self-sufficient, but hopefully the links to other learning resources will be enough to fill the blanks are make it a helpful learning resource as well. If you're a visual learner, those external learning resources are illustrated, or even oriented towards visual learning.
Mental model
Once we're clear why we use a VCS (Version Control System) where we record changes inside commits (or in other words we commit our changes to the history; I'm assuming some familiarity with this terminology), let's look at Git more specifically.
One thing I think is crucial to understand Git, is getting an accurate mental model of the concepts behind it.
First, that's not really important, but Git doesn't actually record changes, but rather snapshots of our files (at least conceptually; it will use packfiles to store things efficiently and will actually store changes –diffs– in some cases), and will generate diffs on-demand. This sometimes shows in the result of some commands though (like why some commands show one file removed and another added, while other commands show a file being renamed).
Now let's dive into some Git concepts, or how Git implements some common VCS concepts.
Commit
A Git commit is:
- one or more parent commit(s), or none for the very first commit (root)
- a commit message
- an author and an author date (actually a timestamp with timezone offset)
- a committer and commit date
- and our files: their pathname relative to the repository root, their mode (UNIX file-system permissions), and their content
Each commit is given an identifier determined by computing the SHA1 hash of this information: change a comma and you get a different SHA1, a different commit object. (Fwiw, Git is slowly moving to SHA-256 as the hashing function).
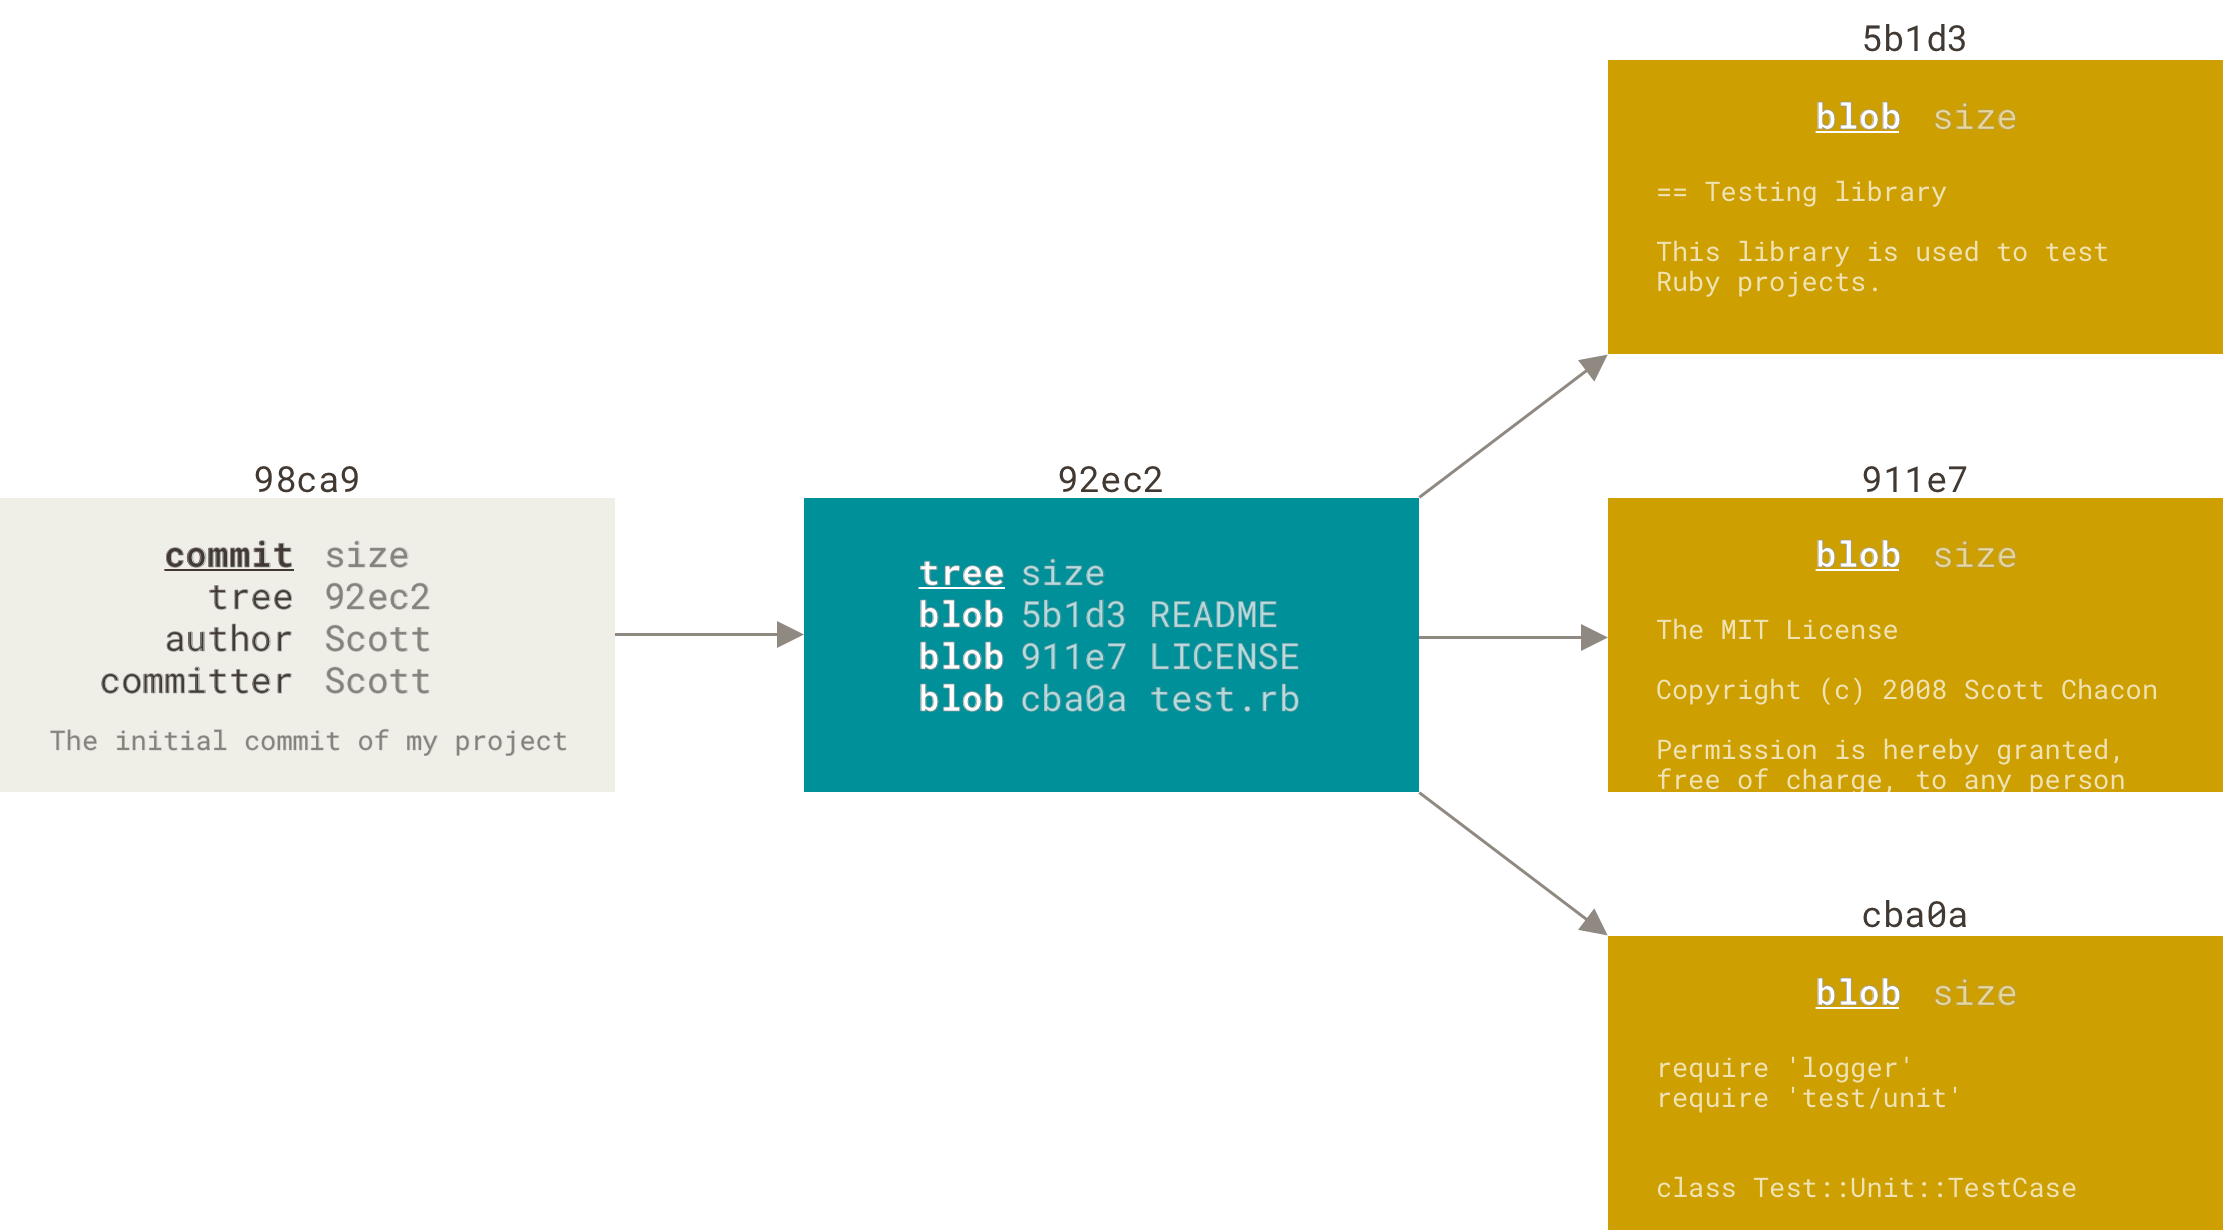
Aside: how's the SHA1 computed?
Git's storage is content-adressed, meaning that each object is stored with a name that's directly derived from its content, in the form of its SHA1 hash.
Historically, Git stored everything in files, and we can still reason that way. A file's content is store as a blob, a directory is stored as tree (a text file that lists files in the directory with their name, mode, and the SHA1 of the blob representing their content, and their subdirectories with their name and the SHA1 their tree)
If you want the details, Julia Evans wrote an amazing (again) blog post; or you can read it from the Pro Git book.
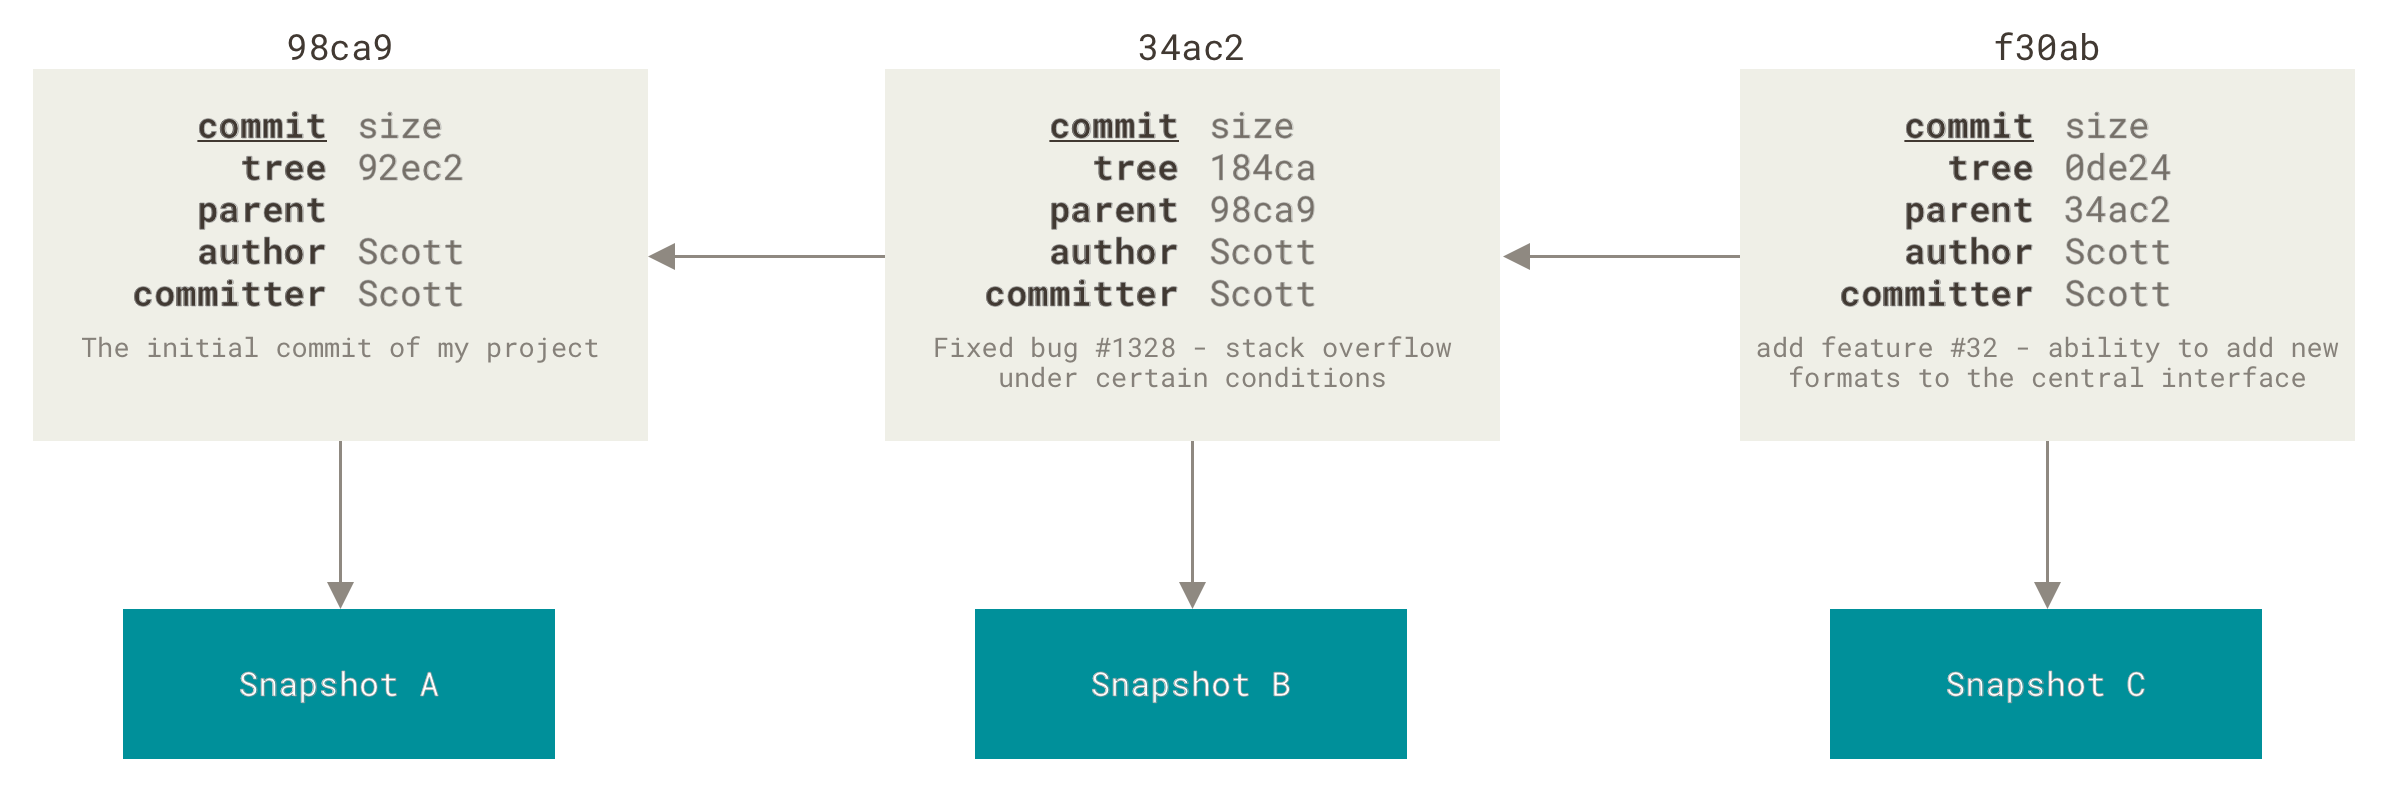
The parent commit(s) in a commit create a directed acyclic graph that represents our history: a directed acyclic graph is made of nodes (our commits) linked together with directed edges (each commit links to its parent(s) commit(s), there's a direction, hence directed) and cannot have loops/cycles (a commit will never be its own ancestor, none of its ancestor commits will link to it as a parent commit).
References, branches and tags
Now SHA1 hashes are impractical to work with as humans, and while Git allows us to work with unique SHA1 prefixes instead of the full SHA1 hash, we'd need simpler names to refer to our commits: enter references. Those are labels for our commits that we chose (rather than Git).
There are several kinds of references:
- branches are moving references (note that
mainormasteraren't special in any way, their name is only a convention) - tags are immutable references
HEADis a special reference that points to the current commit. It generally points to a branch rather than directly to a commit (we'll see why later). When a reference points to another reference, this is called a symbolic reference.- there are other special references (
FETCH_HEAD,ORIG_HEAD, etc.) that Git will setup for you during some operations
The three states
When you work in a Git repository, the files that you manipulate and record in the Git history are in your working directory. To create commits, you'll stage files in the index or staging area. When that's done you attach a commit message and move your staged files to the history.
And to close the loop, the working directory is initialized from a given commit from your history.

Aside: ignoring files
Not all files need to have their history tracked: those generated by your build system (if any), those specific to your editor, and those specific to your operating system or other work environment.
Git allows defining naming patterns of files or directories to ignore. This does not actually mean that Git will ignore them and they cannot be tracked, but that if they're not tracked, several Git operations won't show them to you or manipulate them (but you can manually add them to your history, and from then on they'll no longer be ignored).
Ignoring files is done by putting their pathname (possibly using globs) in ignore files:
.gitignorefiles anywhere in your repository define ignore patterns for the containing directory; those ignore files are tracked in history as a mean to share them between developers; this is where you'll ignore those files generated by your build system (build/for Gradle projects,_site/for an Eleventy website, etc.).git/info/excludesis local to the repository on your machine; rarely used but sometimes useful so good to know about- and finally
~/.config/git/ignoreis global to the machine (for your user); this is where you'll ignore files that are specific to your machine, such as those specific to the editors you use, or those specific to your operating system (e.g. the.DS_Storeon macOS, orThumbs.dbon Windows)
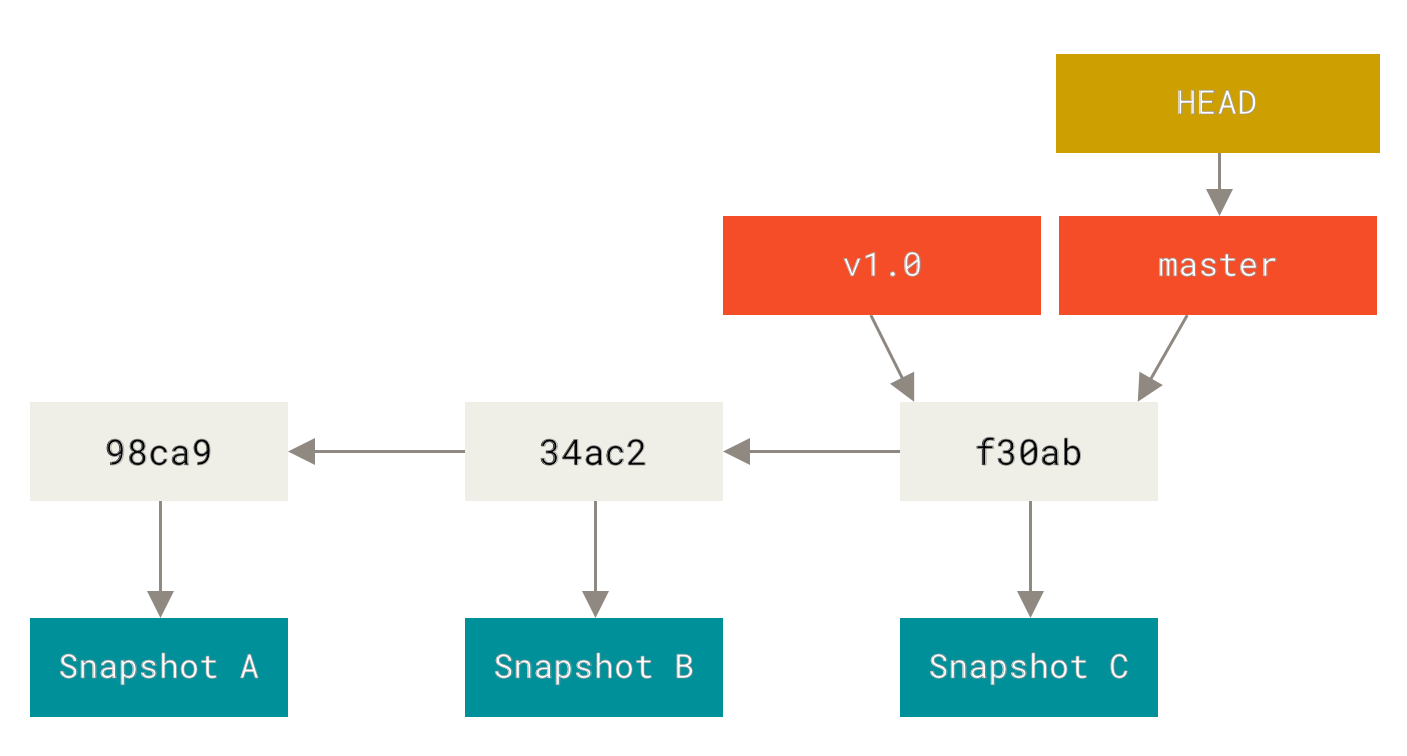
Summing up
Here's another representation of all those concepts:

Basic operations
This is where we start talking about Git commands, and how they interact with the graph:
git initto initialize a new repositorygit statusto get a summary of your files' stategit diffto show changes between any two of your working directory, the index, theHEAD, or actually between any commitgit logto show and search into your history- creating commits
git addto add files to the indexgit committo transform the index into a commit (with an added commit message)git add -pto add files interactively to the index: pick which changes to add and which ones to leave only in your working directory, on a file-by-file, part-by-part (called hunk) basis
- managing branches
git branchto show branches, or create a branchgit switch(alsogit checkout) to check out a branch (or any commit, any tree, actually) to your working directorygit switch -b(alsogit checkout -b) as a shortcut forgit branchandgit switch
git grepto search into your working directory, index, or any commit; this is kind of an enhancedgrep -Rthat's aware of Gitgit blameto know the last commit that changed each line of a given file (so, who to blame for a bug)git stashto put uncommitted changes aside (this includes staged files, as well as tracked files from the working directory), and later unstash them.
Commit, branch switching, and HEAD
When you create a commit (with git commit), Git not only creates the commit object, it also moves the HEAD to point to it.
If the HEAD actually points to a branch, as is generally the case, Git will move that branch to the new commit (and HEAD will continue to point to the branch).
Whenever the current branch is an ancestor of another branch (the commit pointed by the branch is also part of another branch), committing will move HEAD the same, and branches will diverge.
When you switch to another branch (with git switch or git checkout), HEAD moves to the new current branch, and your working directory and index are setup to ressemble the state of that commit (uncommitted changes are tentatively kept; if Git is unable to do it, it will refuse the switch).
For more details, and visual representations, see the commit and checkout sections of Mark Lotato's A Visual Git Reference (be aware that this reference was written years ago, when git switch and git restore didn't exist and git checkout was all we had; so the checkout section covers a bit more than git switch as a result).
Of course, the Pro Git book is also a good reference with visual representations; the Branches in a Nutshell subchapter covers a big part of all of the above.
Aside: Git is conservative
As we've seen above, due to its content-addressed storage, any “change” to a commit (with git commit --amend for instance) will actually result in a different commit (different SHA1).
The old commit won't disappear immediately: Git uses garbage collection to eventually delete commits that aren't reachable from any reference.
This means that many mistakes can be recovered if you manage to find the commit SHA1 back (git reflog can help here, or the notation <branch-name>@{<n>}, e.g. main@{1} for the last commit that main pointed to before it changed).
Working with branches
We've seen above how branches can diverge.
But diverging calls for eventually merging changes back (with git merge).
Git is very good at that (as we'll see later).
A special case of merging is when the current branch is an ancestor of the branch to merge into. In this case, Git can do a fast-forward merge.
Because operations between two branches will likely always target the same pair of branches, Git allows you to setup a branch to track another branch.
That other branch with be called the upstream of the branch that tracks it.
When setup, git status will, for example, tell you how much the two branches have diverged from one another: is the current branch up to date with its upstream branch, behind it and can be fast-forwarded, ahead by a number of commits, or have they diverged, each by some number of commits.
Other commands will use that information to provide good default values for parameters so they can be omitted.
To integrate changes from another branch, rather than merging, another option is to cherry-pick (with the same-named command) a single commit, without its history: Git will compute the changes brought in by that commit and apply the same changes to the current branch, creating a new commit similar to the original one (if you to know more about how Git actually does it, see Julia Evans' How git cherry-pick and revert use 3-way merge).
Finally, another command in your toolbelt is rebase.
You can see it as a way to do many cherry-picks at once but it's actually much more powerful (as we'll see below).
In its basic use though, it's just that: you give it a range of commits (between any commit as the starting point and an existing branch as the end point, defaulting to the current one) and a target, and it cherry-picks all those commits on top of the target and finally updates the branch used as the end point.
The command here is of the form git rebase --onto=<target> <start> <end>.
As with many Git commands, arguments can be omitted and will have default values and/or specific meanings: thus, git rebase is a shorthand for git rebase --fork-point upstream where upstream is the upstream of the current branch (I'll ignore --fork-point here, its effect is subtle and not that important in every-day use), which itself is a shorthand for git rebase upstream HEAD (where HEAD must point to a branch), itself a shorthand for git rebase --onto=upstream upstream HEAD, a shorthand for git rebase --onto=upstream $(git merge-base upstream HEAD) HEAD, and will rebase all commits between the last common ancestor of upstream and the current branch on one hand and the current branch (i.e. all commits since they diverged) on the other hand, and will reapply them on top of upstream, then update the current branch to point to the new commits.
Explicit use of --onto (with a value different from the starting point) is rare actually, see my previous post for one use case.
We cannot present git rebase without its interactive variant git rebase -i:
it starts with exactly the same behavior as the non-interactive variant,
but after computing what needs to be done, it'll allow you to edit it (as a text file in an editor, one action per line).
By default, all selected commits are cherry-picked, but you'll be able to reorder them, to skip some commit(s), or even combine some into a single commit.
You can actually cherry-pick a commit that was not initially selected, and even create merge commits, thus entirely rewriting the whole history!
Finally, you can also stop on a commit to edit it (using git commit --amend then, and/or possibly create new commits before continuing with the rebase), and/or run a given command between two commits.
This last option is so useful (to e.g. validate that you didn't break your project at each point of the history) that you can pass that command in an --exec option and Git will execute it between each rebased commit (this works with non-interactive rebase too; in interactive mode you'll see execution lines inserted between each cherry-pick line when given the ability to edit the rebase scenario).
For more details, and visual representations, see the merge, cherry pick, and rebase sections of Mark Lodato's A Visual Git Reference, and the Basic Branching and Merging, Rebasing, and Rewriting History subchapters of the Pro Git book. You can also look at the “branching and merging” diagrams from David Drysdale's Git Visual Reference.
Working with others
For now, we've only ever worked locally in our repository. But Git was specifically built to work with others.
Let me introduce remotes.
Remotes
When you clone a repository, that repository becomes a remote of your local repository, named origin (just like with the main branch, this is just the default value and the name in itself has nothing special, besides sometimes being used as the default value when an command argument is omitted).
You'll then start working, creating local commits and branches (therefore forking from the remote), and the remote will probably get some more commits and branches from its author in the mean time.
You'll thus want to synchronize those remote changes into your local repository, and want to quickly know what changes you made locally compared to the remote.
The way Git handles this is by recording the state of the remote it knows about (the branches, mainly) in a special namespace: refs/remote/.
Those are known as remote-tracking branches.
Fwiw, local branches are stored in the refs/heads/ namespace, and tags in refs/tags/ (tags from remotes are generally imported right into refs/tags/, so for instance you lose the information of where they came from).
You can have as many remotes as needed, each with a name.
(Note that remotes don't necessarily live on other machines, they can actually be on the same machine, accessed directly from the filesystem, so you can play with remotes without having to setup anything.)
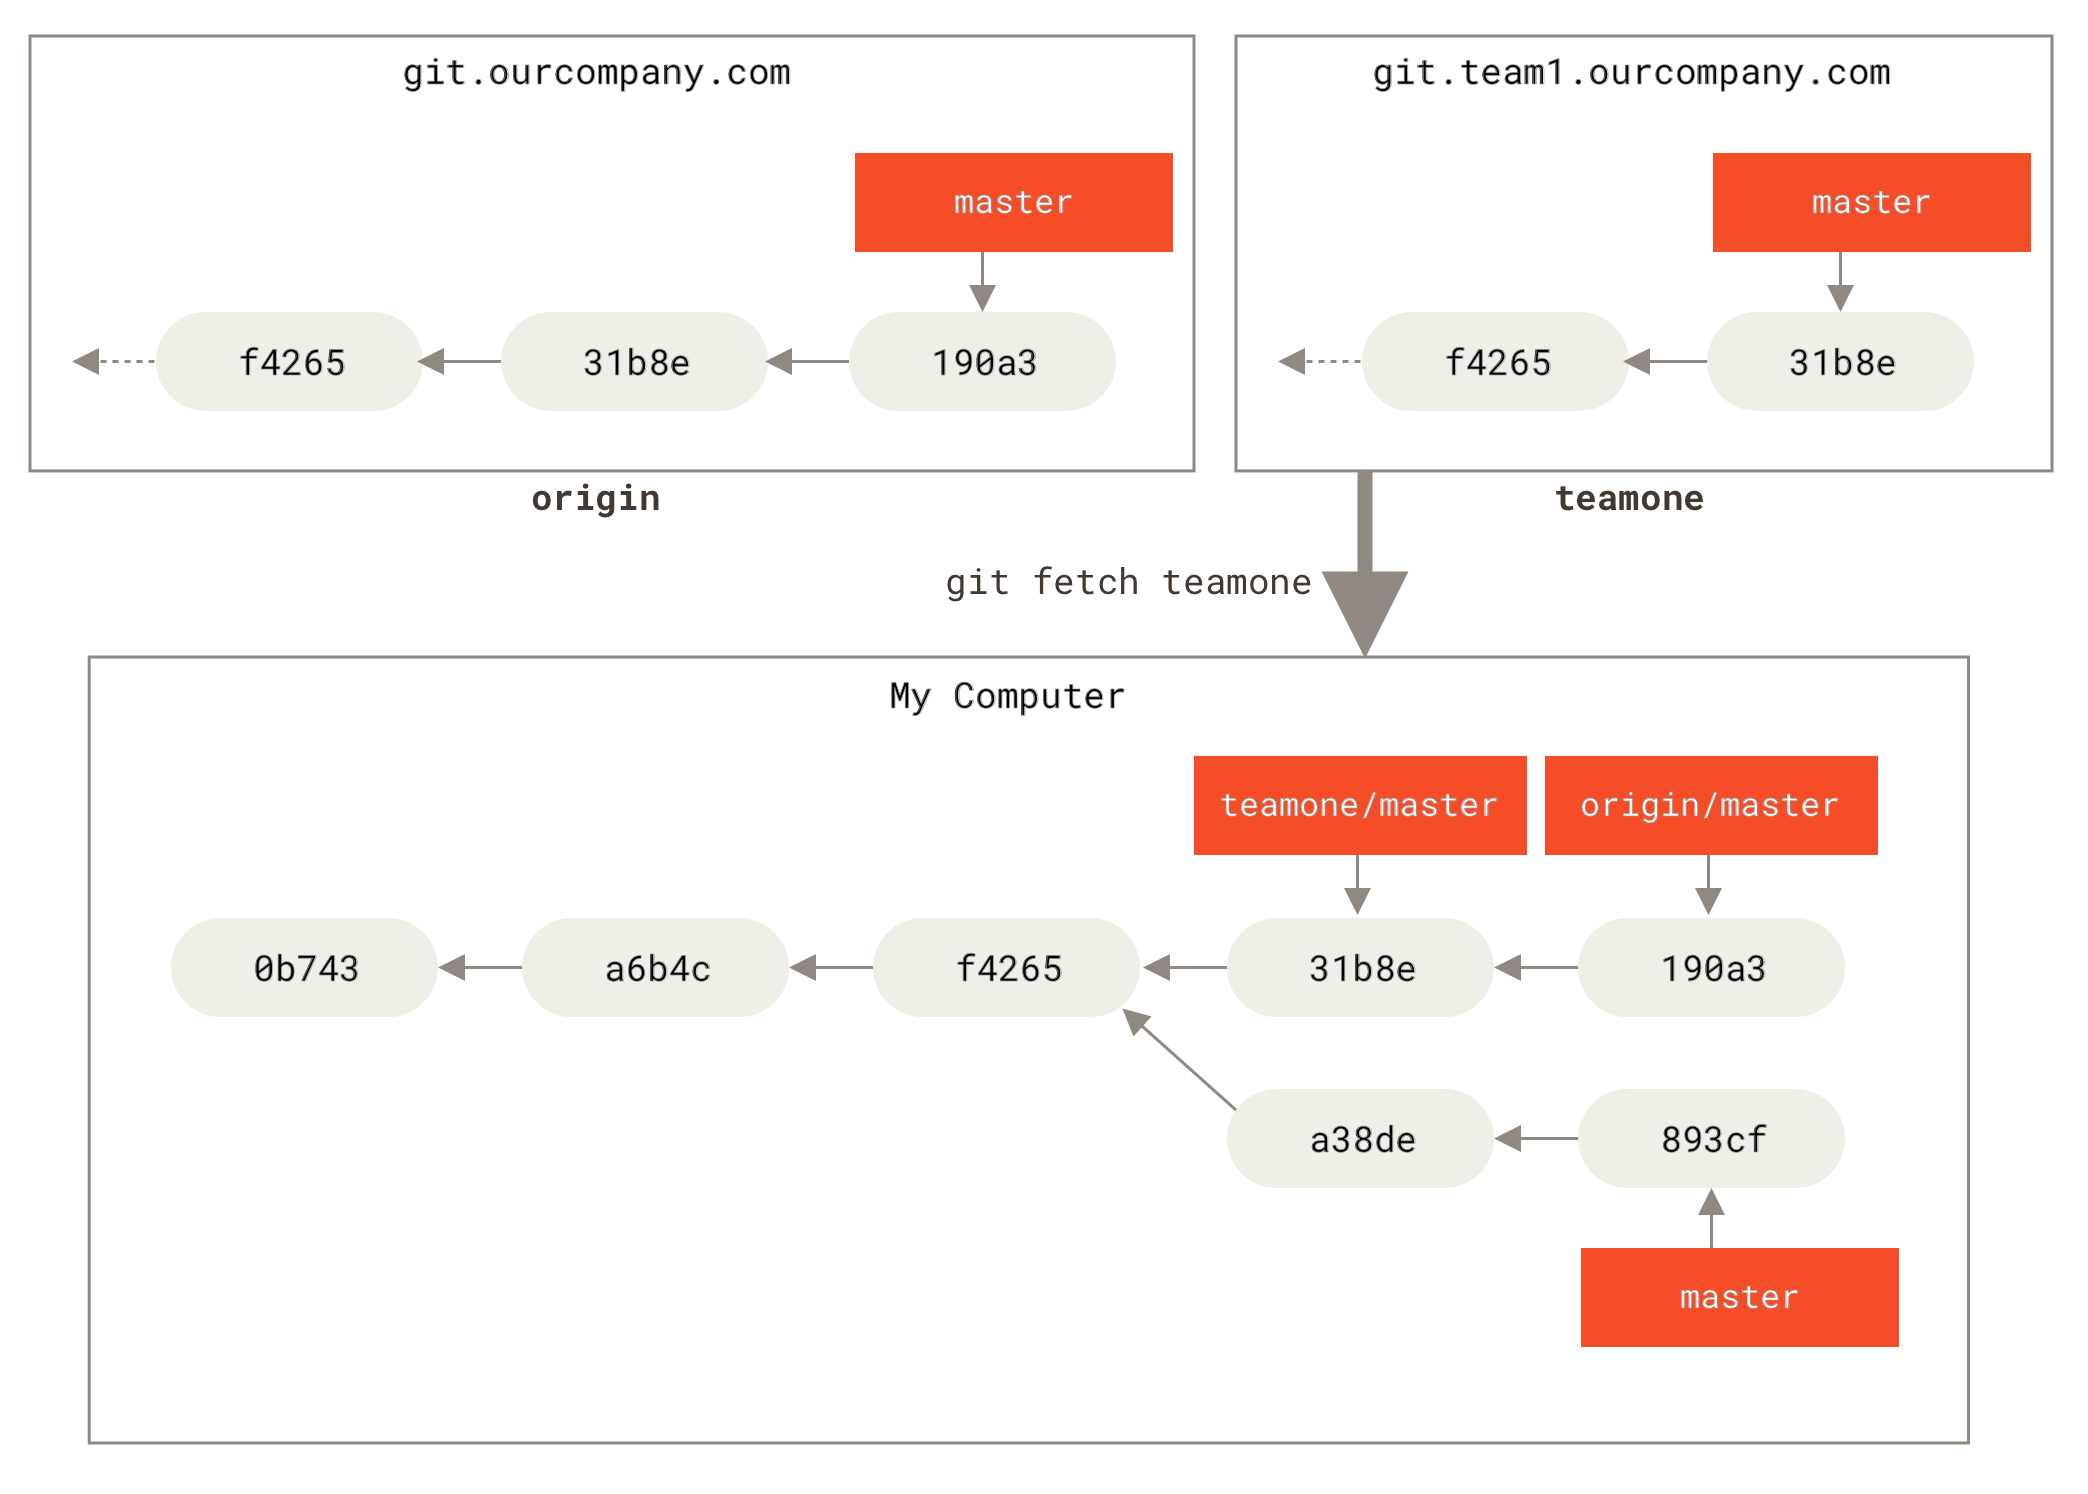
Fetching
Whenever you fetch from a remote (using git fetch, git pull, or git remote update), Git will talk to it to download the commits it doesn't yet know about, and will update the remote-tracking branches for the remote.
The exact set of references to be fetched, and where they're fetched, is passed to the git fetch command (as refspecs) and the default value defined in your repository's .git/config, and configured by default by git clone or git remote add to taking all branches (everything in refs/heads/ on the remote) and putting them in refs/remote/<remote> (so refs/remote/origin/ for the origin remote), with the same name (so refs/heads/main on the remote becomes refs/remote/origin/main locally).
You'll then use branch-related commands to get changes from a remote-tracking branch to your local branch (git merge or git rebase), or git pull which is hardly more than a shorthand for git fetch followed by a git merge or git rebase.
BTW, in a number of situations, Git will automatically setup a remote-tracking branch to be the upstream of a local branch when you create it (it will tell you about it when that happens).
Pushing
To share your changes with others, they can either add your repository as a remote and pull from it (implying accessing your machine across the network), or you can push to a remote. (If you ask someone to pull changes from your remote, this is called a… pull request, a term you'll have probably heard of from GitHub or similar services.)
Pushing is similar to fetching, in reverse: you'll send your commits to the remote and update its branch to point to the new commits.
As a safety measure, Git only allows remote branches to be fast-forwarded;
if you want to push changes that would update the remote branch in a non-fast-forward way, you'll have to force it, using git push --force-with-lease (or git push --force, but be careful: --force-with-lease will first ensure your remote-tracking branch is up-to-date with the remote's branch, to make sure nobody pushed changes to the branch since the last time you fetched; --force won't do that check, doing what you're telling it to do, at your own risks).
As with git fetch, you pass the branches to update to the git push command, but Git provides a good default behavior if you don't.
If you don't specify anything, Git will infer the remote from the upstream of the current branch, so most of the time git push is equivalent to git push origin.
This actually is a shorthand to git push origin main (assuming the current branch is main), itself a shorthand for git push origin main:main, shorthand for git push origin refs/heads/main:refs/heads/main, meaning to push the local refs/heads/main to the origin remote's refs/heads/main.
See my previous post for some use cases of specifying refspecs with differing source and destination.

git push (source: Git Visual Reference, David Drysdale)For more details, and visual representations, see the Remote Branches, Working with Remotes, and Contributing to a Project subchapters of the Pro Git book, and the “dealing with remote repositories” diagrams from David Drysdale's Git Visual Reference. The Contributing to a Project chapter of Pro Git also touches about contributing to open source projects on platforms like GitHub, where you have to first fork the repository, and contribute through pull requests (or merge requests).
Best practices
Those are directed towards beginners, and hopefully not too controversial.
Try to keep a clean history:
- use merge commits wisely
- clear and high-quality commit messages (see the commit guidelines in Pro Git)
- make atomic commits: each commit should be compile and run independently of the commits following it in the history
This only applies to the history you share with others. Locally, do however you want. For beginners, I'd give the following advices though:
- don't work directly on
main(ormaster, or any branch that you don't specifically own on the remote as well), create local branches instead; it helps decoupling work on different tasks: about to start working on another bug or feature while waiting for additional details on instructions on the current one? switch to another branch, you'll get back to that later by switching back; it also makes it easier to update from the remote as you're sure you won't have conflicts if your local branches are simply copies of the remote ones of the same name, without any local change (except when you want to push those changes to that branch) - don't hesitate to rewrite your commit history (
git commit --amendand/orgit rebase -i), but don't do it too early; its more than OK to stack many small commits while working, and only rewrite/cleanup the history before you share it - similarly, don't hesitate to rebase your local branches to integrate upstream changes (until you shared that branch, at which point you'll follow the project's how branching workflow)
In case of any problem and you're lost, my advice is to use gitk or gitk HEAD @{1}, also possibly gitk --all (I'm using gitk here but use whichever tool you prefer), to visualize your Git history and try to understand what happened.
From this, you can rollback to the previous state (git reset @{1}) or try to fix things (cherry-picking a commit, etc.)
And if you're in the middle of a rebase, or possibly a failed merge, you can abort and rollback to the previous state with commands like git rebase --abort or git merge --abort.
To make things even easier, don't hesitate, before any possibly destructive command (git rebase), to create a branch or a tag as a "bookmark" you can easily reset to if things don't go as expected.
And of course, inspect the history and files after such a command to make sure the outcome is the one you expected.
Advanced concepts
Only a few of them, there are many more to explore!
- Detached
HEAD: thegit checkoutmanpage has a good section on the topic, also see my previous post, and for a good visual representation, see the Committing with a Detached HEAD section of Mark Lodato's A Visual Git Reference. - Hooks: those are executables (shell scripts most of the time) that Git will run in reaction to operations on a repository; people use them to lint the code before each commit (aborting the commit if that fails), generate or post-process commit messages, or trigger actions on the server after someone pushes to the repository (trigger builds and/or deployments).
- A couple rarely needed commands that can save you hours when you actually need them:
git bisect: an advanced command to help you pinpoint which commit introduced a bug, by testing several commits (manually or through scripting); with a linear history, this is using bisection and could be done manually, but as soon as you have many merge commits this becomes much more complex and it's good to havegit bisectdo the heavy lifting.git filter-repo: a third-party command actually, as a replacement to Git's ownfilter-branch, that allows rewriting the whole history of a repository to remove a mistakenly added file, or help extract part of the repository to another.
We're done.
With this knowledge, one should be able to map any Git command to how it will modify the directed acyclic graph of commits, and understand how to fix mistakes (ran a merge on the wrong branch? rebased on the wrong branch?) I'm not saying understanding such things will be easy, but should at least be possible.